restoration harcourt

A collection of my thoughts and experiences during the restoration of a 1924 bungalow in Los Angeles.

Monday, February 27, 2006

We Have an Entry Door!

After a lot of research and a few visits to lumber yards, I finally purchased my new entry door last week. I went with a T.M. Cobb in the Stickley style made of Douglas Fir. I chose this door because it is a simple door - fitting for a more modest bungalow - and I liked the 3 windows at the top. I will have the door stained to match the floors and will use a Madison entry set by Baldwin in an oil-rubbed bronze finish.

Friday, February 24, 2006

Faux Fireplace Discovery

Upon checking out the demo of the living room, I discovered that a faux fireplace existed at one time. This finally solves the mystery of whether or not my bungalow had a fireplace. Most of the houses on my block have wood burning fireplaces with exposed chimneys along the exterior. Even the real estate ad that led me to the house listed a fireplace in the description.

From my preliminary research, it was not uncommon for houses in the 1920's to have decorative fireplaces along with the woodburning variety. Seeing the ghosting of the mantle and the trim for windows along the wall was definitive proof that a decorative fireplace did exist. It also answers the question of "Why would you have a window over a fireplace?" I have a transom or piano window over the area where the mantle used to be. Since the fireplace is decorative, a window in that location would not be an issue.

I also pulled up the carpet in that area and you can see where a tile hearth used to be. Now it just has a few planks of old wood covering the space. My plan is to use some reproduction Malibu tile I purchased a few months ago as accents along with a colored coordinating field tile. A link to a tile that has the same design (but differenct color) as my accent tile is here.

I happened upon a web site for a foundation dedicated to historical tile by doing a Yahoo Search on Batchelder. The foundation also sells tile catalogs from Batchelder, Catalina, Malibu, etc. I plan on getting a few catalogs to research fireplace designs that I can use or modify to recreate my hearth.

Before and Almost After

Now that the vast majority of the electrical and plumbing work is out of the way, I can focus on decor and getting the house back together. I am very eager to get things finished in time for my parents' visit (they are expected at the end of March!). Sometimes I stress out on what I still have left to do, but I also need to take a look back on what I've accomplished thus far. So here are some before and almost after shots for inspiration as well as motivation:
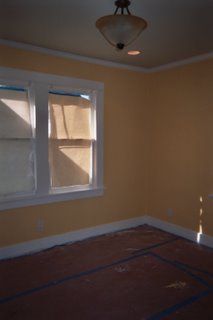
Bedroom1 Before:


Bedroom1 Almost After:
I went with a cheery color to get me going in the morning. The shot is kind of dark, but you get the general idea. The wall color is Country Comfort by Benjamin Moore. The trim is painted White Opulence and the ceiling Grand Teton White also from Benjamin Moore. I had the carpet removed and the original hardwood floors refinished.

Bedroom2 Before:

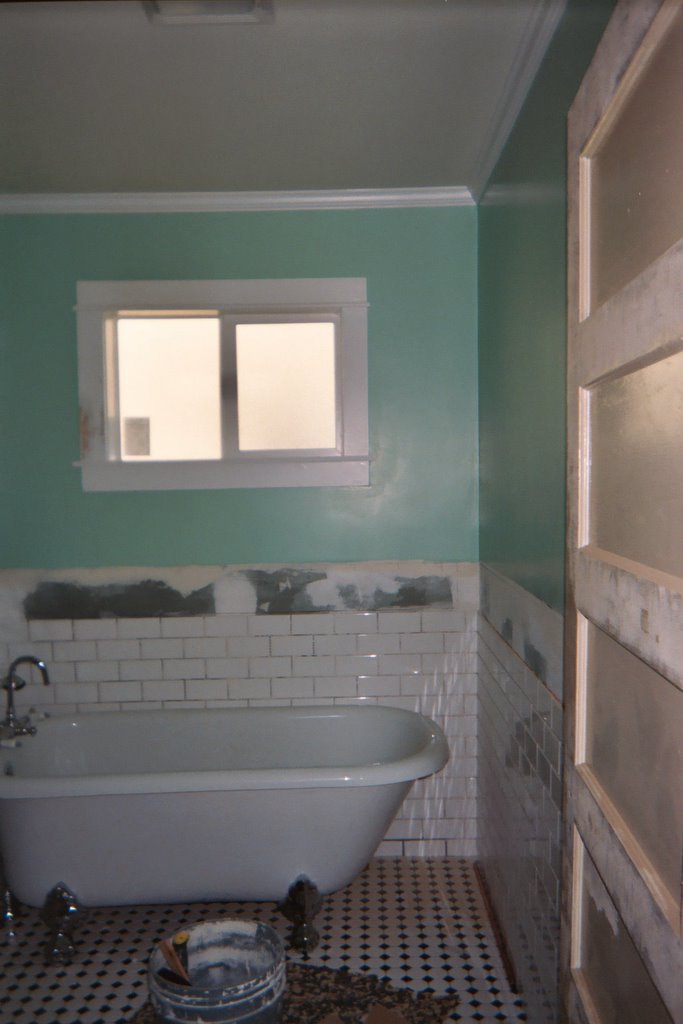
This is more of a "Work in Progress" than a "Before" picture.


Bedroom2 Almost After:
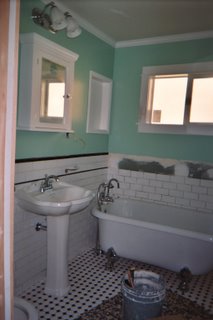
This will be a den/home office since I'm short on space. The wall color is Wythe Blue from the Benjamin Moore Historical Collection. The trim and ceiling paint are the same as Bedroom1. I will use this combination for all the rooms for consistency. The great thing about the bedrooms is that the original baseboard and window trim were not removed. I'm also keeping the original windows as well.


Hallway Before: I don't think I have a picture of this particular area. As far as its prior state, all of the trim and plaster in this area were removed by POs and replaced with faux "wood" paneling and trim. Most of the mitre edges did not meet and it unfortunately looked more like a bad picture frame instead of the craftsman-style trim that is in most of the rooms in the house.

Hallway Almost After:

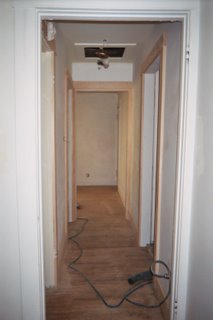
I had all of the new trim recreated to match the existing trim located in other rooms of the house courtesy of my sister and brother in-law. For a small area, there are a lot of doorways! I think the trim makes the space look great now. Here's another shot that shows a somewhat closer view of the trim:


I plan to post more pictures when I've completed these rooms. I'm working on the Living Room now so look for a similar "Before and Almost After" post soon.

Sunday, February 19, 2006

Work In Progress

So what have I done so far? My house is a modest bungalow - 2 bedrooms, 1 bath, single story. My focus has been on the interior, namely the bathroom, 2 bedrooms and a hallway. The bungalow's layout is such that these rooms are on one side of the house with the living room, kitchen, breakfast nook and laundry area on the other half. By focusing on the bathroom and bedrooms first, I can move in and continue work on the other living areas with minor disruption to my daily routine. Or at least that's the plan.

Here are a couple of pictures of my bathroom after the tenant moved out:

The first picture is the view of the bathroom looking from the entry. The second picture is of the former shower/tub fixtures. On the opposite side of the bath fixtures is the toilet.

Now the work in progress:


This is the current bathroom layout. It has a more open feel despite the small space. The toilet and pedestal sink are Repertoire from American Standard. I had two niches built in to store frequently used items and to use for display. The shelves are not installed yet, so it may be hard to visualize. I really love my clawfoot tub. It gives the room a period feel that harmonizes well with the other fixtures. I went with white subway tile with black accents along the walls and black and white hex tile for the floor. The wall color reminds me of the old tub.


This is a closer look at the pedestal sink and medicine cabinet. The faucet is American Standard and the towel ring and soap dish are from Rejuvenation. Excuse the dust - I'll do a final cleaning once the bathroom is ready for use.

Inaugural Post - Restoration Harcourt

This is the inaugural post of my new blog - Restoration Harcourt. Here's a condensed version of how I got here: I bought my 1924 bungalow in November 1999. I'm a first-time homeowner and the house had a lot of charm and was also in my price range. I moved in and began small DIY projects - painting, installing dimmer switches, swapping out bathroom fixtures and hardware. I wanted to do more, but was constrained by my budget - or lack thereof.

Fast forward 4 years later and I decided to try my hand at being a landlord and live at the beach. Beach life was fun and I learned a lot being a landlord. Upon close examination, I realized something was missing. I never really settled into my new surroundings and I missed my home and my old neighborhood. As a result, I began the process of planning what it would take to restore my home to its true potential.

But first I had to deal with the condition the house was left in. Years of benign neglect had taken their toll due to the house being a rental property. Now I have the time and more of the financial means to do what is necessary to bring the house back to its former glory.