
Progress So Far - Part Two
December marks the one-year anniversary of when I began the remodel/restoration of my bungalow. This continues the review of the progress I've made so far in order to reflect on how much has been accomplished.
5/06
* Not a lot of work this month due to my graduation. However, I did host my father and sister who were in town for my commencement.
* To date all rooms are functioning - excluding the kitchen, nook and laundry. Lots of boxes still as I need to downsize and organize my things in bookcases, storage units, etc.
* I finally get my Dish receiver installed at the house. Though I saw some great shows on public television, I missed my HGTV and DIY daily fix.
6/06
* Big month for the house. In about a weekend the kitchen, nook and laundry have new floors and new or repaired walls and ceilings.
* The walls are painted Kennebunkport Green from the Benjamin Moore Historical Colors line. It's a deep green with sort of a gray undertone.
* A door that I purchased from Silverlake Yards in installed at the back entry. The doorknob is an existing Baldwin in oil-rubbed bronze with a Schlage deadbolt to match.
* The Schoolhouse Electric and Rejuvenation light fixtures look great in the new space. I also had a reproduction schoolhouse fixture in the nook installed that matches a fixture that was installed in the hallway.
* Kitchen cabinets are selected, purchased and installed. I have a couple of glass fronted upper cabinets for display and I added a pantry cabinet for additional storage.
* I went with a subway tile for the backsplash and same decorative tile to cap off the top. I chose a gray grout for contrast and to avoid trying to keep white grout clean.
* All appliances are installed. I scored a dishwasher for free that works great and purchased a stainless steel range hood for the gas oven. My side-by-side fridge was a graduation gift from my parents. Due to a mishap I was able to upgrade my model at a nominal cost.
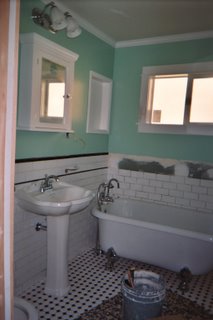
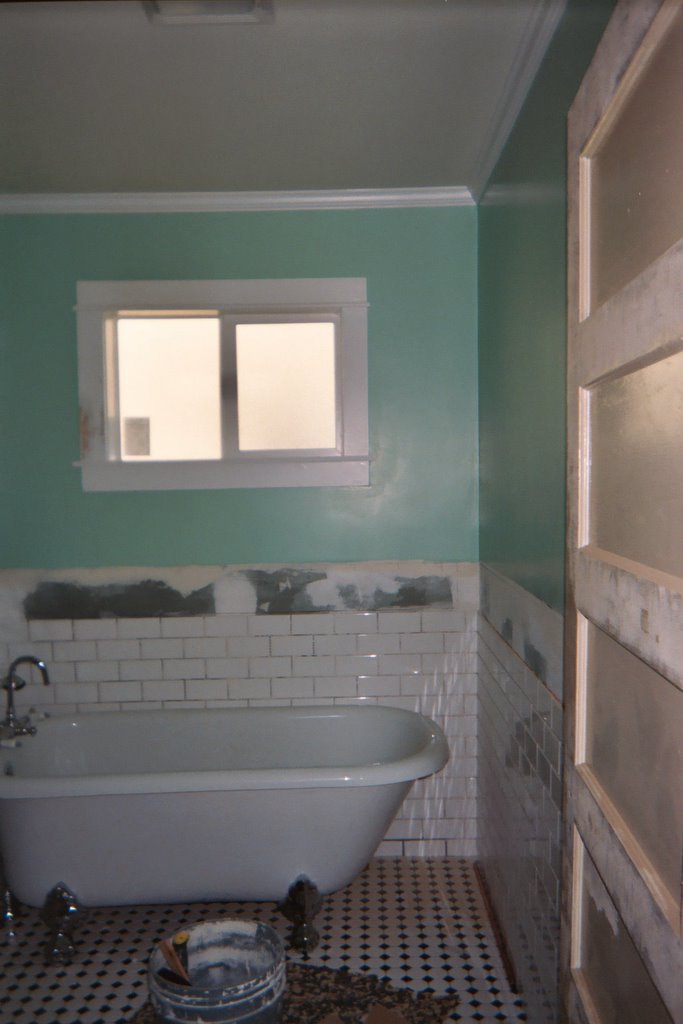
* Purchased a D-ring shower curtain ring for the clawfoot tub. Ring is installed and I added two sets of shower curtains and liners to enclose the tub area.
* Glass shelves for the bathroom niches are installed. My washer and dryer are finally back in the laundry room. No more laundromat for me!!
7/06
* With the interior under control, though not yet "done" I start to focus on the exterior. I had the trim painted a warm beige and the window sashes a deep red. I like how the sash is emphasized now instead of blending in with the trim.
* I replaced my failing wood fence with another wood fence made of redwood. The posts are pressure-treated lumber and were secured with concrete. Also the fence boards do not make direct contact with the ground to avoid subsequent decay and rot.
* Installed a timer for my sprinkler system. For fun, I had it installed in the box where the old knob and tube wiring used to be. Now I don't have to go outside in the cold and water my lawn - I can just program a watering schedule and it's good to go.
8/06
* On a much needed break due to school and restoration overload.
* My break is short lived as I begin to think about what projects to tackle next. Interior? Exterior?
5/06
* Not a lot of work this month due to my graduation. However, I did host my father and sister who were in town for my commencement.
* To date all rooms are functioning - excluding the kitchen, nook and laundry. Lots of boxes still as I need to downsize and organize my things in bookcases, storage units, etc.
* I finally get my Dish receiver installed at the house. Though I saw some great shows on public television, I missed my HGTV and DIY daily fix.
6/06
* Big month for the house. In about a weekend the kitchen, nook and laundry have new floors and new or repaired walls and ceilings.
* The walls are painted Kennebunkport Green from the Benjamin Moore Historical Colors line. It's a deep green with sort of a gray undertone.
* A door that I purchased from Silverlake Yards in installed at the back entry. The doorknob is an existing Baldwin in oil-rubbed bronze with a Schlage deadbolt to match.
* The Schoolhouse Electric and Rejuvenation light fixtures look great in the new space. I also had a reproduction schoolhouse fixture in the nook installed that matches a fixture that was installed in the hallway.
* Kitchen cabinets are selected, purchased and installed. I have a couple of glass fronted upper cabinets for display and I added a pantry cabinet for additional storage.
* I went with a subway tile for the backsplash and same decorative tile to cap off the top. I chose a gray grout for contrast and to avoid trying to keep white grout clean.
* All appliances are installed. I scored a dishwasher for free that works great and purchased a stainless steel range hood for the gas oven. My side-by-side fridge was a graduation gift from my parents. Due to a mishap I was able to upgrade my model at a nominal cost.
* Purchased a D-ring shower curtain ring for the clawfoot tub. Ring is installed and I added two sets of shower curtains and liners to enclose the tub area.
* Glass shelves for the bathroom niches are installed. My washer and dryer are finally back in the laundry room. No more laundromat for me!!
7/06
* With the interior under control, though not yet "done" I start to focus on the exterior. I had the trim painted a warm beige and the window sashes a deep red. I like how the sash is emphasized now instead of blending in with the trim.
* I replaced my failing wood fence with another wood fence made of redwood. The posts are pressure-treated lumber and were secured with concrete. Also the fence boards do not make direct contact with the ground to avoid subsequent decay and rot.
* Installed a timer for my sprinkler system. For fun, I had it installed in the box where the old knob and tube wiring used to be. Now I don't have to go outside in the cold and water my lawn - I can just program a watering schedule and it's good to go.
8/06
* On a much needed break due to school and restoration overload.
* My break is short lived as I begin to think about what projects to tackle next. Interior? Exterior?
posted by harcourt | 4:27 PM
|
0 comments
![]()


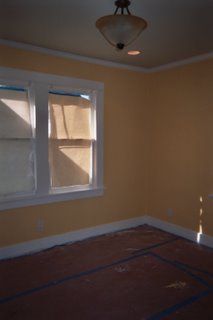 Bedroom2 Before:

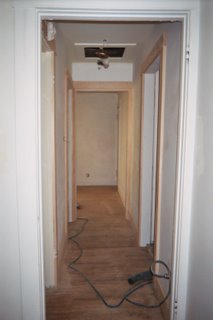 I had all of the new trim recreated to match the existing trim located in other rooms of the house courtesy of my sister and brother in-law. For a small area, there are a lot of doorways! I think the trim makes the space look great now. Here's another shot that shows a somewhat closer view of the trim:


